Thursday, 12 December 2013

Random Brew 3: Caramel coffee and vanilla mead

I had a few hours to kill yesterday and thought "what the hell, lets do a quick and simple mead". So, similarly to the mead this post will be the same, quick and simple!

1700g of honey, approx 4litres water, ground caramel flavoured coffee (around 4 tablespoons I just threw some in) and 2 vanilla pods, slit and seeds removed and added separately. All of these were added together (holding back 2 liters of water) and brought up to the boil then simmered for 15 minutes. Adding in the extra water I then measured the SG which gave 1.090 which would yield around 12% added a small amount of nutrient (around half a teaspoon) and transferred to the demijohn.

After getting it all set up I felt the mix was still too warm to pitch the yeast into so I dropped it into a water bath for around 20 minutes while the yeast was re-hydrating. I still fear I pitched it too early however. After leaving it for several hours and coming back there was still no activity so I added a second lot of yeast to the must. This morning there seems to be some activity however it is very slow and laboured. 

Updates:

The bochet is still going well... I have added 1/2 teaspoon of nutrient at this point.

The banana melomel has now settled down considerably so the airlock has now been added back onto it. Interestingly the water from the blowoff smelt highly of bananas however the mead itself just smells strongly of alcohol. Strange how exactly the same thing can have two different smells.

Tuesday, 10 December 2013

Random Brew 2: Banana Melomel


I was persuaded into making this mead courtesy of my girlfriend. If there is one item of food she would happily live on and forego all other foods, it would be bananas. So off I went to the great library of the internet for some research to find if people had already been making this and how to get the banana flavour into mead. I stumbled upon a thread where someone else had been in a similar situation to me and various posts had been left referencing other attempts people had done and their processes. I had my start.

On a random trip out to Tesco's last week I happened across some bananas that were still really really good but reduced in price beyond belief. Not even sure why they were reduced in all honesty: maybe excess stock. Who knows. I picked up 2.5kg of bananas for 28p and considered myself rather lucky! Onto the cooking...


The bananas were sliced with skin on and placed into a pan with 4 pints of water. The "stew" was brought up to the boil and then simmered for around 30/45 minutes. At this point your house will begin to smell of bananas. Also, unless I had done something wrong at this point, boiled bananas turned the water a yellowy-grey colour which, to say this is something to be drunk as a pleasant aperitif, is not one of the most attractive colours. This concoction was then sieved and strained to remove all the pulp leaving only the banana flavoured water. To this, around 1700g of honey was added and dissolved thoroughly. I opted for the extra honey in this batch as I wanted more of a dessert mead for this batch with such sweet flavours from the banana. Next I did all of the usual preparations and sterilising before transferring the mead to the demijohn and topping up with cold water to 1 gallon. I pitched my yeast; the same yeast from the bochet and sealed her up. This batch also has 1tsp of yeast nutrient added due to the high alcohol potential. I'd rather have my yeast live a little longer before they get too drunk.

On the science side, the batch was tested for SG and yielded 1.095 or in terms of potential alcohol, 12.7%. I am hoping that while fermenting the melomel will clear up a bit and give a more pleasant colour to look at rather than the swamp water that there is in there currently. Taste-wise however it is lovely. Obviously non alcoholic and the honey flavour should reduce somewhat but the banana taste is great yet subtle. So far it has been fermenting for a day and the CO2 production is going like a trooper.

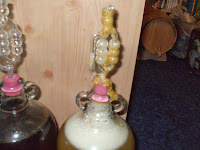
...And after one day of fermenting I wish I hadn't said it was going like a trooper! I got home from work last night to a demijohn that was bubbling through its airlock. Never a good sight.I look the airlock off, cleaned and re-sterilized it and attached it back on after pouring out some of the liquid in the demijohn to give it a little more room. After a few hours everything seemed to have been solved up till the point I wanted to go to bed and it began to do the same again. Obviously no shops are really open at this time to help me so I had to make an emergency blow-off tube with what I had lying around.I've put a picture up to show the job I had to do... please forgive the looks of it! I melted an airlock and plastic tubing together and sealed any holes with wax. Seems to do the trick though.


To update with the bochet, it is still going strong after little over a week. The yeast doesn't really show any signs of slowing up just yet but I am anticipating a possible restart being needed... we shall see. It now has one friend to go with it and next week it should be going by another. 3 day weekends seem to be a great excuse to do some brewing!

Thursday, 5 December 2013

Random Brew: Bochet

After my original "playful" batches as I will call them, I did copious amounts of research and had improved how I both plan and execute my brewing. I have decided to plan my meads and brew them in such a way that the entire brew, from start to finish, is an entirely repeatable exercise so I can improve them for later trials. Originally I was going to start the plain meads last weekend however I stumbled upon the road block of funds (As I wanted to do 4Gal rather than 1 simultaneously) and opted instead for a Bochet.

I've been wanting to do this mead for a while now after reading about it on Homebrew Talk and decided that this should be the one to start the December brew off with. I already had most of the ingredients for this and even ordered in some vanilla pods to add into the mix too. For those who don't know a Bochet is a "burnt mead". You boil down the mead for over 2 hours until the whole lot becomes black and thicker and doesnt even really bubble up any more. It should give flavours that resemble deep caramels, toffee and even toasted marshmallows (so vanilla should be right at home!).

So here's where I began:

Equipment: 1gal demijohn, 2m plastic tubing for siphoning, airlock and bung, pan for preparing the must, hydrometer, measuring cylinder, very long spoon, cleaning and sterilising powder

Ingredients: Approx 1360g honey, tap water up to 4.5 liters, 2 vanilla pods, high alcohol/dessert yeast.

*Note: The yeast I have been using as advertised as written above. In subsequent brews I shall be using Lalvin yeasts to note the difference between the strains more clearly.

Method: Begin with the obvious and most important step of sterilising everything thoroughly. Next, as said in the opening paragraphs you literally do just dive straight into the seemingly endless process of boiling down all the honey for over 2 hours.

  A constant and vigil watch is required over this. If you've ever boiled milk before and let it go a bit too much you'll know how quickly your hob can be covered in frothy, hot milk. Imagine a similar case with honey except it's hotter and stickier and you really really really do not want it touching you... Trust me.

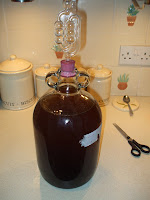
After it has been reduced down I added (gradually <= This is very important too) water to dissolve with the reduced honey and create my must. After I added up to around 1 liter or so I added the vanilla pods too, opened up and seeds scraped out. Siphoning into the demijohn is next. When siphoning at this point I always leave the end of the tube high up in the demijohn and let the must fall freely into it. This aerates the must and gives the yeast more oxygen to begin their fermentation. If you can, even shaking the demijohn can be beneficial; just please ensure the demijohn is properly sealed and you maintain a good grip. After the adding I topped up to level with cold water to balance out the temperature to match the water that I would use to activate the yeast and, after waiting 20 minutes for it, I pitched the yeast giving as an end product what you can see below. This is definitely the darkest coloured mead I will ever make! I haven't been home to check on it since setting it up but I have been informed it is fermenting nicely.


Tests were also conducted on this batch to boot. Before putting into the demijohn I tested the batch with a hydrometer for specific gravity which gave 1.085 (a potential alcohol of 11.3%) however after putting it into the demijohn the fluid level wasn't quite enough. More water was added and SG was retested yielding 1.070/1.075 (a potential alcohol of 9.5%).

As a side note to this post, I have received some post from Italy too... My new oak barrel has arrived ready for me to start using as soon as I get the mead ready for it! Really looking forward to drinking the results before I've even begun! Thanks for reading :)


Thursday, 14 November 2013

Oak ageing

After selling some parts of another hobby of mine I managed to find just over £100 to invest back into this hobby. I've always had the essentials of homebrewing but it's time I started a long term project so as the title suggests I have decided to start ageing my mead. I'm going to start the whole process from scratch and see where it takes me but every step I take I shall record here so I can improve in the future, and anyone else can have a go should they also find that £100 magically appears! Firstly the equipment: I originally thought about trying to source a pre-used barrel that had already had a life of ageing whiskey. I emailed various suppliers within the UK but unfortunately I either didn't get a reply or found they reuse them. After more digging and research I resigned to the fact I would have to buy a new one (which also probably makes the task easier in terms of hygiene for the storage of the mead inside). Yet again, more research followed and I eventually decided to purchase from ebay and from Italy.


Some keen brewers may have noticed I said barrel above and are nitpicking right now saying a barrel is specific and must be 36 gallons. Yes I know but the "barrel" I have chosen is only 15 liters so I can't even call it a pin so for all intents and purposes from here on in it shall be referred to as a cask. As of writing this I ordered it yesterday so it is still on its' way to me.

The next task on my list is to sort out the ingredients and equipment for the mead itself. I want to make 4 demijohns up with as close to identical contents as possible to age altogether (and have a touch left over for sampling!) . Over the next week or so I shall be writing myself a detailed recipe which I must not stray from so I can get this as exact as I can and, most importantly, repeatable.

I shall be spending a lot of time at home over the winter period too so I shall be adding a few other experiments here too including a burnt mead or bochet which I am really looking forward to trying. Others to look out for include a raspberry mead (this time with syrup rather than reducing the raspberries myself) and the chocolate mead from my earlier playing around with cocoa beans and vodka.

Thanks for reading :)

Tuesday, 5 November 2013

Chocolate Mk 2

You'll know from my first post that I tried to create a chocolate mead... and failed. So I started looking for other ways to infuse this popular flavour into the honey. I hunted for a while but couldn't find anything practical or useful. Adding cocoa powder or chocolate sauce would not work and I was still adamant on using the raw ingredient itself. It wasn't until recently, and by pure chance, that I was wandering through the city market and stumbled upon a guy selling chocolate wine. Naturally I was intrigued and, after trying his wine and having a brief chat with him about brewing, he hinted to me that he used the cocoa bean and used vodka too... perfect! I now had a method to research. I wanted to know how vodka could be used to pull out flavours from various items and stumbled upon this link: http://www.wikihow.com/Extract-Mint-Oils-from-Leaves.

I thought I'd try the same and got some jars and experimented with mint too just like the instructions gives, lemon balm and cocoa beans. They were washed, and sealed in separate jars and left for about 2 weeks before I checked them again. I noticed the leaves nearer the top of the jars were turning a strange brown colour and the smell from the jars was being affected as a result. These leaves were removed and the jars left a little longer. After the full time I strained out all the leaves and smelled and tasted the liquid. The mint was not bad but not amazing either. I think the browning from the first leaves has tainted the liquid from what its' true flavour should be. The lemon balm mixture was a disaster... the liquid turned brown and smelled of what I can only describe as evil. Finally the cocoa beans I have still left due to starting them slightly later from waiting for the beans to arrive. The beans have so far swollen with the vodka and the liquid turning a wonderful chocolatey brown. Things definitely look promising in the goal for chocolate mead!


My first post

I've been brewing mead for almost 2 years now and a good friend of mine mentioned I should start writing a blog to both record all of my successes (but mostly failures) and to share with other people methods of brewing mead in the hope that people will also share back and ultimately we can find the perfect mead.

I first picked up the bug for home-brewing when I was a lot lot younger however the idea of not being allowed something only spurred me on to find a way in which I could. I remember the first attempt I ever tried the home-brew process was in my early teenage years by creating a makeshift demijohn out of a two liter pop bottle and trying to ferment blackberry juice with dried cooking yeast.  To say it did not work would be an understatement; after not turning the blackberries into a juice in the first place and leaving most of the pulp within the bottle the "brew" decided to froth resembling the monstrosity that is akin to placing soap in a microwave and pressing go. We all have to start somewhere I suppose.

After a while the trials improved slightly before producing a drinkable (I really just mean non-toxic) elderberry wine. I naively tried entering it into a competition where I'm surprised it wasn't disqualified. After that A levels and then Uni kicked in and the whole home-brew experience got put on hold.

Once you have the bug for brewing though it won't really leave you so as I completed my university degree and headed back home I invested in a small amount of kit, just the bare essentials, and set about looking what to transform next. Honey was the answer I came across. Seemingly the easiest option of all the home-brews due to no real need for added sugar or any extra chemicals, to me it was the most natural product which could be made. I started looking around for recipes, hints, tips, anything to get me going in the right direction; I had experimented and played around enough for fun that this time I was going to do it right.

As with my original concoction I decided to use blackberries again in this first mead attempt as where I live they're highly abundant when the season it right... providing you beat the birds to them of course. I remembered the original failure though and, learning from the past, I made a syrup from the fresh blackberries to add into the brew.


Not only would this add an extra flavour, but the added sugar in the syrup would add a little more fuel for the yeast. And so I began the brewing. Unfortunately I did not record the exact measurements used in this brew (or the raspberry mead after this with an identical method) so I cannot write it down however I am now recording quantities and times for brews so I can better share and improve.


After a month of waiting the brew turned out to be successful. It seems that following some instructions is a much better way to go! In total the brew made around a dozen bottles which were either drunk or given away as presents to those who said they particularly enjoyed it. This got me thinking of what other flavours I could add to honey to complement each other and which ultimately lead me to my favourite brew so far... Lavender mead. I vaguely remember the quantities used in this brew so I shall list them below:

4 - 4.5 liters of water
5 jars of honey (approx. 454g each)
5 stems of fresh lavender (washed)

A simple list of ingredients but this was my first mead like this so I wanted to keep it as simple as possible. I will be trying another soon with dried lavender and also adding additional sugars to increase the alcohol content... Definitely going to need it to keep warm through winter! As for the process I used the whole contents was added to a pot to be boiled together. Give it a decent amount o time to simmer to allow the lavender to properly infuse through the honey and water. It should make your house smell rather good in the meantime. The brewing side of the process is relatively easy too. Mead tends to require a lot less time than wines to ferment fully so 2-3 weeks should be ok but if you do want your brews a little stronger don't hesitate to leave them. I use a high alcohol / dessert wine yeast for all of my mead. I did enter this one into the same competition as mentioned before and it won 1st prize! I was just entering if for fun so when I came out with that result I was very happy to say the least.


It was around this time that a friend of mine got involved too and decided to opt for the mass production method. I remember driving back home from the city rather carefully with 20-30 demijohns in the boot of the car. Several other experiments followed from the lavender mead too; trying new flavours or methods of imparting flavours into the mead. Almond, violet, and chocolate were tried next by using oils or in the case of chocolate, the bean itself. The end products were interesting... The almond one didn't really do anything apart from just taste like an ordinary mead. The violet was offensive; it smelt wonderful but was with all perfume you want it in your nose and not sprayed down your throat. The chocolate was interesting as an experiment however the end product just tasted like a normal mead akin to the almond as I believe I used an incorrect method to try to add the flavour to the mead. I attempted to boil the beans and used the water and the beans themselves in the brewing mix. This I have found is futile as I shall explain in another post but if you ever do have some cocoa beans I strongly recommend boiling them just for the smell that fills the house. Ever baked your own bread? It's like that effect but with a buttery chocolate. Divine!

The quest however continues to find the perfect mead but things are looking up...